Welcome
iHeadache is unique online tool that helps you collect headache data and create reports that you and your physician can use to determine the best course of therapy. The program uses criteria that are modified from the International Headache Society classification system to aid in the diagnosis of migraine headache, probable migraine headache, and other types of headaches. Most importantly, it gathers data and prepares reports that better summarize your headache burden, aids in the determination of triggers and allows for better evaluation of your acute and preventative therapies.
The inclusion of medications in the acute therapy and preventative therapy lists does not constitute an endorsement of any product for its use in migraine.
 Important: If this is your first time using iHeadache, you need to set up a profile for yourself before you start using the system. The profile is where you define treatments, triggers, and symptoms most relevant to you.
Where to Go for More Information
- Online Help – Each page on iHeadache Online has comprehensive support. Click the
 to open the help for the current page. In addition, you can click the Help link at the top of any iHeadache page to open application help.
- Tutorials – The tutorials show you how to use some of the most common features of iHeadache.
- Contact Support – Fill out the support request form on our website
Using iHeadache
The Workspace
The main iHeadache workspace consists of tabs that you use to record and view headache data and set up your information in the system:
- My Diary is where you create your headache diary entries. Before you add your first headache, you must go to the My Profile tab and set up your profile.
- The Dashboard shows different types of headache information in charts and graphs. It also has a calendar that lets you look up your existing headache entries. This features helps you spot patterns with your headaches.
- The Calendar gives you a visual way to view your headache history, type of headaches, time they began and ended and the treatments you used.
- The Headache Log gives you a simple way to review your entries. You can quickly see entries that are incomplete and update them as necessary.
- The Preventative Tab is where you enter the dates you started and stopped taking medications, the dose and the reason for stopping a medication. Once you've added preventative treatments to your profile, you come to this tab to set up the details about them.
- The Report tab allows you to prepare reports about your headaches that you can share with your physician.
- My Profile is where you define the treatments, triggers and symptoms that appear on your drop-down lists, and set important preferences for reports.
At the top of every screen is a menu bar:
- My Account is where you go to update your personal information or change your password.
- Click the Help link to display help on using iHeadache.
 Tip: When you see this icon , you can click it to display help for the current window.
Before You Begin
Before you start recording headaches, it's important for you to go to the My Profile tab to set up your profile. In this step you define the acute and preventative treatments you want to track, your triggers, and your symptoms, and other information related to your headaches. You can also add any treatments, triggers, or symptoms that are not part of the standard list. Then go to the Preventatives tab to define details about your preventative treatments.
Setting Up Your Profile
The iHeadache system contains comprehensive lists of common treatments, triggers, and symptoms. In your profile you can specify which of these are applicable to you, so that when you enter headache data, your drop-down lists show only what you need. You also set up your own treatments, triggers and symptoms and they will be available to you in your lists as well. You also define application preferences that are used for headache classification and reports. Click the My Profile tab to set up your preferences and complete each of the views.
Tip: On each window, you can click to show detailed help.
- Preferences
 Define application preferences that are used for headache classification and reports.
- Acute Treatments
 Define the common acute treatments you want to appear on your drop-down lists and add any custom treatments you take that are not on the standard list.
- Preventative Treatment Profile
 Define the common preventative treatments you want to appear on your drop-down lists and add any custom treatments you take that are not on the standard list.
After you've done this, you need to go to the Preventatives tab to define details about your preventative treatments.
Define the common preventative treatments you want to appear on your drop-down lists and add any custom treatments you take that are not on the standard list.
After you've done this, you need to go to the Preventatives tab to define details about your preventative treatments.
- Triggers
 Define the triggers you want to appear on your drop-down lists and add any custom triggers that are not on the standard list.
- Symptoms
 Define the symptoms you want to appear on your drop-down lists and add any custom symptoms that are not on the standard list.
Adding a New Headache
- To add a headache for the current day, go to the My Diary tab and click Add Headache for Today.
- You can also add a headache entry for another day. On the calendar, scroll through the months to find a particular day and select the day your headache occurred. Click the Add Headache for Selected Date button.
Tip: If you click above the date on a date in the calendar that has a Headache icon, all headaches entered on that date appear in the Information area in the upper right. If you click a headache in the Information area, details about the headache appear in the Headache Summary section.
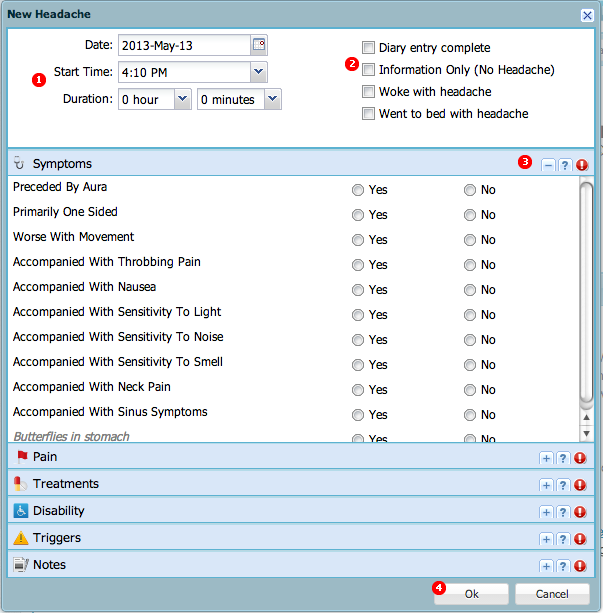 Use the Start Time and Duration fields to record when the headache started and how long it lasted. If you add pain or medications to this headache, iHeadache automatically updates the duration of your headache to include the time you added this information.
 Note: iHeadache only lets you enter a maximum of 24 hours per headache. For headaches that last more than one day, create a new headache entry for each day.
 - Check any of the four checkboxes that apply:
- Woke with headache ∗ Click this checkbox if you woke up with this headache.
- Went to bed with headache ∗ Click this checkbox if you went to bed with this headache.
- Information Only ∗ You can check this box to confirm that you've gathered data on a specific day, even if you did not have a headache. You might be asked to do this, for example, if you participate in a study.
- Diary Entry Complete ∗ When you are sure you've entered all the information for a headache, check this box to mark this diary entry as complete.
- Fill out the panels to answer questions about pain, symptoms, disability and triggers.
 opens a panel.
 closes the current panel and opens the next one.
On each window, you can click to show detailed help.
- After you've entered all the information, remember to click the OK button to save your information.
Customizing Your Dashboard
The Dashboard is where you go for summary information about your headaches. The main Dashboard view shows types of headaches, as a color-coded graph, and the days you recorded having headaches. Other views let you see more details related to your headaches, such as symptoms and treatments. The information shown on all of your Dashboard views comes from the headaches you've recorded. The Dashboard is flexible and can be organized to display information that's most important to you.
On the main Dashboard view,Headache Types is a chart that summarizes the headaches you've recorded. The headache types are color-coded so you can see at a glance what kinds of headaches you experienced during the timeframe you chose and how many headaches you had. Headache Days is a chart showing the proportion of headache-free days compared to days you had headaches. By default, the most recent twelve months of headache data is shown, but you can display data for a different timeframe.
The other Dashboard views show more information related to your headaches, such as treatments and triggers. You can attach charts from any of these other views to your main Dashboard. Click the pushpin  icon, located in the top right corner. That section will appear on your main Dashboard view.
You can customize the data that is shown in the Headache Types, Days, or other charts you have pinned to your Dashboard.
Setting up Your Preventative Treatments
A preventative treatment is one that you take on a regular basis to prevent headaches, as opposed to one that you take once a headache starts. Defining your preventative treatments is a two-step process. iHeadache provides a list of common treatments that have been shown to prevent headaches. You are probably only taking a few of these. Instead of having to scroll through the entire list of treatments every time you add a headache, you define just the ones you want to track and these are the options that appear on your drop-down lists. iHeadache also tracks the dose and when you started or stopped taking a medication, so you need to define this information as well.
Step 1: Define the preventative treatments you want to track on your profile. 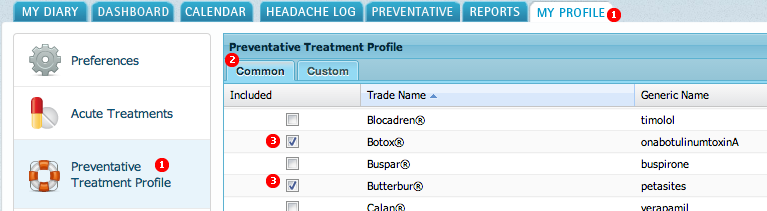
- On the My Profile tab, click Preventative Treatments Profile.
- Click the Common tab.
- Select the checkbox next to the treatments you want to add and click the OK button.
Step 2: Define details about the preventative treatments. 
- Go to the Preventatives tab and click the Active Treatments tab.
- Click
 and enter the details in the fields that appear.
- In the Name field, click the control
 to display the list of your preventative treatments. Select a treatment from the list.
- In the Dose field, enter the dose you take, in milligrams.
- Use the Start date field to enter the date you started this treatment.
You can type the dates in the fields or click the calendar icon
 and select a day from the calendar that appears.
- Click the Update button.
Selecting a timeframe for data
On many screens in iHeadache, the data displayed is for the most recent twelve months. To select a different timeframe, type the dates in the From: and To: fields, or click the small calendar icons and select the dates on the calendar that appears. Use the arrow keys 
 to move through the months. The standard view is by calendar month, but iHeadache can display your data organized by week, 28 days, 30 days, or quarter. Select the view you prefer in the Graph by: field and click the Refresh button
  to show the updated view.
Customizing the display in Dashboard Graphs
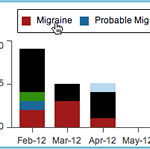
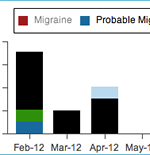
Graphs that have a legend and keys can be customized. Clicking a key in the legend alternates between hiding and displaying that data in the graph. For example, in the Headache Types chart you might want to see all your headaches except migraines. When you click the Migraines key in the legend it becomes grayed out, and the graph automatically adjusts itself to show only those headaches that were not classified as migraines. When you click the key again, migraines reappear.
 |
 |
|
Migraines, shown in red, are included until you click the Migraines key in the legend. |
Migraines are excluded from the graph. Click the Migraines key again to show them. |
Customizing data tables
Many screens show data in the form of a table. You can change the appearance of the tables to your preferences. For example, you can sort data by a particular column, rearrange the columns or change their sizes.
- When you move your cursor to the far right of any column header, a control
 appears. Click it to display a small menu that lets you sort the data in the table by the current column. You can choose ascending or descending.
- You can also hide columns in the table. When you move your cursor over Columns on the menu, another menu appears, showing the name of the columns in the table. You can uncheck a column to remove it from the view. You can restore the column later by opening this menu and checking it again.
- To change the width of a column, move your mouse cursor to the border between any two columns in the gray bar at the top of the table. The cursor changes to a vertical bar with a left/right-pointing arrow. Click and drag the bar to increase or decrease the column width.
- To move a column, click and drag the column header and drop it in the new location. Two small blue arrows appear in front of a column to indicate you can place the column there.
Attaching Graphs from other Views to Your Main Dashboard
You can attach sections to your main Dashboard view. Click the pushpin icon , located in the top right corner. That section will appear on your main Dashboard view the next time you look at it.
Adding Custom Treatments and Triggers
iHeadache has extensive lists of standard treatments and triggers, but if something is not listed, you can add your own.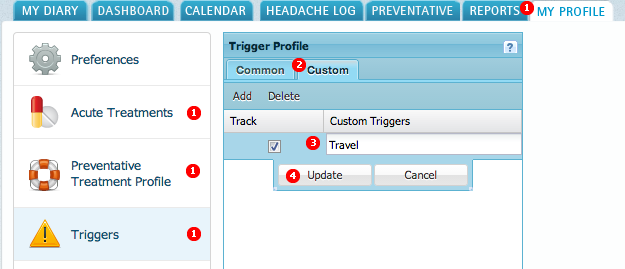
- On the My Profile tab, click Acute Treatments , Preventative Treatments , or Triggers .
- Click the Custom tab.
- Click the Add button and fill in the fields that appear.
- Click the Update button, then
the OK button to save your entry.
Tip: Be sure the checkbox in the Track column is checked. You can define a custom treatment or trigger, or stop tracking one you've already defined, by unchecking this checkbox.
Viewing your headaches
There are several ways you can see the headaches you've entered:
From the My Diary tab:
 In the calender window, days that have a headache entry are marked with a headache icon
  . When you click the icon a list of the headaches recorded for that day appears. When you click a headache on the list, details appear in the information window and Headache Summary section of the dairy.
Tip:Click  to make changes to a headache.
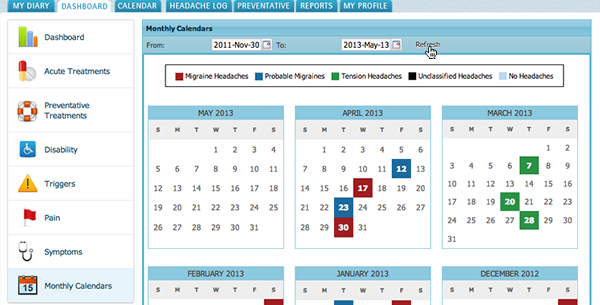
From the Dashboard:
The Monthly Calendars view shows an overview of the headaches that have been recorded. Headaches are color-coded so you can see at a glance what kinds of headaches you entered. This view is an overview only and does not display details. When you open this view, the past twelve months of headache data is shown. You can show headache data for a different timeframe by selecting the months in the From: and To: fields and clicking Refresh.
From the Calendar Tab:
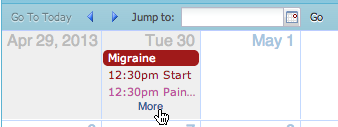 The Calendar tab is a detailed calendar view of your headaches for a timeframe you choose. The calendar has a daily, weekly and monthly view. To see your headache information for a particular day, you can jump directly to a specific date on the calender. Type the date in the Jump to field, or click the calendar icon and select the date from the calendar pop-up that appears. Click Go. You can also click Go To Today if you are viewing another day's headache, and can click the arrows
  to go forward and backward through the calendar.
To show details about a headache, such as the pain you experienced, start time, or treatments, find the headache in the monthly view and click More.
Tip: You can click a headache to make changes to it.
Making changes to a headache
There are different ways you can locate an existing headache to update it.
From the My Diary tab:
- On the calender view in the upper left, find the date the headache occurred.
- Click the icon and select the headache you want to edit from the list that appears. Details for the headache are displayed in the Headache Summary section.
- Click the button. A new window appears, similar to the window you used to create the headache.
- Make your changes and click the OK button.
From the Calendar tab:
- Click the headache on the calender. A new window appears, similar to the window you used to create the headache.
- Make your changes and click the OK button.
From the headache log:
-
 Click the Headache Log tab and use the From date and To Date fields to find the headache you want to update.
- Decide what headaches you want to display by checking the checkboxes in the Include and Headache Types sections.
- Click Refresh. The system displays the 12 most recent headaches that meet your criteria. You can use the Recent and Older buttons to move through additional headaches.
- Double-click the headache you want to edit. A new window opens that you can use to make changes to the headache, similar to the one you used to add the headache entry.
Printing Headache Information
On the My Diary tab, use the small monthly calendar in the top left corner to go to the day the headache occurred. The headache icon indicates a headache was recorded on that day. Click a headache icon to show a list of the headaches you recorded for that day, then click the headache you want to print. Information about the headache appear in Headache Summary section. Click the Print  icon.
icon.
Deleting a headache
Deleting a headache is not recommended. However, you can delete a headache if you're certain you really want to.
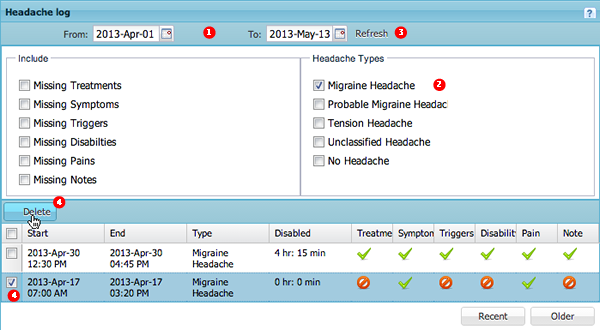 On the Headache Log tab, locate the headache you want to delete. Use the From date and To Date fields to find a specific headache.
- Check the boxes in the Include and Headache Types columns to narrow your search for particular headache types and headaches that are missing information.
- Click Refresh. The system displays the 12 most recent headaches that meet your criteria. You can use the Recent and Older buttons to move through additional headaches.
- Check the checkbox next to the headache you want to delete and click Delete.
Creating Reports
You can use iHeadache to create reports of your headaches. If you have given your physician permission to access your data in iHeadache he or she can generate reports, which they can copy and past into their Electronic Medical Records (EMR). To be able to give your physician or health care provider access to your iHeadache data, the physician must be registered in the iHeadache system and you must add them to your profile.
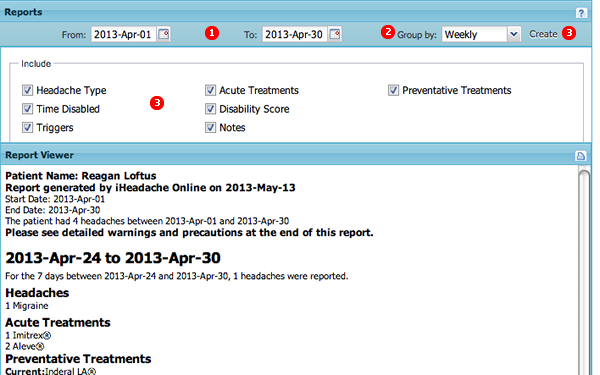 On the Reports tab, Use the From: and To: fields to select the dates to include in the report.
You can type the dates in the fields or click the calendar icon and select a day from the calendar that appears.
On the Reports tab, Use the From: and To: fields to select the dates to include in the report.
You can type the dates in the fields or click the calendar icon and select a day from the calendar that appears. - Click Group by to organize the data on your report by quarterly, monthly, 30 days, 28 days, or weekly.
- In the Include section, check the boxes to specify the data you want to include in your report, then click the Create button. Your report appears in the Report Viewer section.
- If you want to print the report, click .
Sharing Headache Data with Your Doctor
The physicians that you have added to your profile can access your records in iHeadache. To be added to your profile, the physician must first be registered in iHeadache, and once they are you can share your data with them. The physicians that you add to your profile can cut and paste data or import entire reports to their Electronic Medical Records (EMR). iHeadache sends the providers you add an email, notifying them that you asked to give them access to your data. They can confirm or decline you as their patient. Once the doctor has confirmed you as a patient, you can begin sharing data.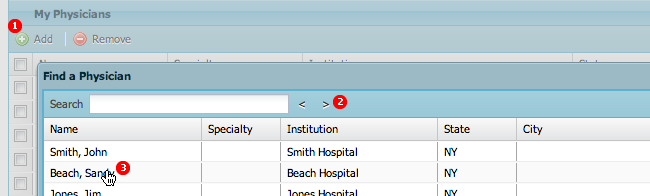
- Click the Add button . The list of physicians/providers appears.
- Use the arrow keys
 to click through the list to find your provider. You can also type a name in the Search box to search for a particular provider. You can also sort the table or arrange the columns to help you find the physician you're looking for.
- Double-click the name of the physician you want to add. The list of physicians and providers closes and the physician's name now appears in the My Physicians window.
- Check the checkbox next to the physician's name and click the OK button.
Updating Your Personal Information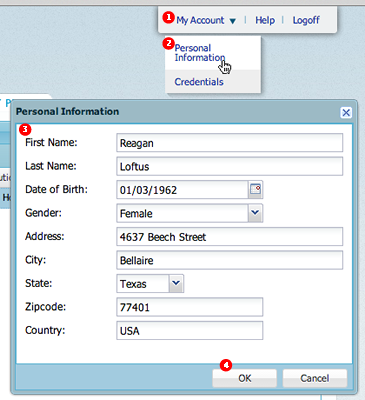
You can update your contact information and date of birth.
- Go to the menu bar near the top of your browser window, and click My Account.
- Select Personal Information on the menu that appears.
- Update the information in the fields.
- Click the OK button to save your changes.
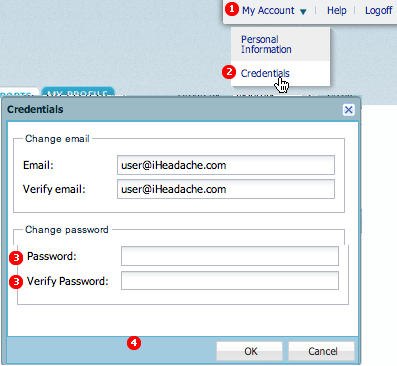
Changing Your Password
 For security, you should occasionally change your iHeadache password.
- Go to the menu bar near the top of your browser and click My Account.
- Select Credentials on the menu that appears.
- Type the new password you want to use in the Password field. The password must be at least six characters long and contain a combination of letters and numbers.
- Type the same password in the Verify Password field.
- Click the OK button to save your changes.
About Headaches
How iHeadache Classifies Headaches
iHeadache classifies headaches as Migraine, Probable Migraine, Tension Headache, or Unclassified Headache.
Migraine
There are two types of Migraines: Classic and Common.
Classic migraines affect approximately 15% of migraine sufferers. With this type of headache, patients experience a temporary neurological symptoms called an aura. The most common auras are:
- unilateral visual symptoms, most usually geometric shapes that slowly expand and move
- one sided numbness or abnormal sensation that travels
- one sided weakness
- speech difficulty
Diagnosis of classic migraine requires at least 2 attacks that include 3 of the following characteristics:
- One or more fully reversible aura symptom(s) indicating focal cerebral cortical and/or brain stem dysfunction.
- At least one aura symptom develops gradually over more than 4 minutes, or 2 or more symptoms occur in succession.
- No individual aura symptoms last for more than 60 minutes. If more than one aura symptom is present, each aura symptom cannot last more than 60 minutes.
- Headaches, which may precede or begin with the aura, must follow within 60 minutes after the aura ends.
A common migraine is a migraine without the aura. To be diagnosed as a migraine, the headache must last at least 4 hours and be accompanied by either nausea, possibly with vomiting, and photophobia (lights seem unusually bright) or phonophobia (sounds seem unusually loud). Common migraines also have at least two of the following characteristics:
- Unilateral (one-sided) location
- Pulsating or throbbing quality (like a heart beat)
- Moderate or severe intensity (moderate is generally defined as inhibiting daily activities and severe is defined as prohibiting daily activities.
- Aggravation by physical activity such as walking stairs or similar routine
Probable Migraine
iHeadache classifies a headache that is probably a migraine, but is missing one of the elements necessary for diagnosis of migraine, as a probably Migraine.
Tension headaches
Tension headaches are intermittent. You may feel like your head is in a vice or that there is a band of pain around your head. With tension headaches, the pain does no throb, there is no nausea and you are not sensitive to light or noise. It may interfere with your ability to function but probably does not incapacitate you.
Unclassified
iHeadache labels headaches as Unclassified when they do not meet the criteria for one of the above types of headaches. There are other types of headaches, such as cluster headaches, that iHeadache does not support. Headaches can also be a symptom of another unrelated and possibly severe illness, so it's important that you have your headaches evaluated by a doctor. It's important to record the most complete information that you can so that iHeadache can make an accurate classification.
The Migraine Disability Assessment Test
iHeadache uses a disability survey similar to the Migraine Disability Assessment Scale (MIDAS) to assess the severity of your disability. The MIDAS tries to determine how many days of your life were affected by headaches to the point that you were unable to participate in your normal activities. Note that the MIDAS has not been validated for use in a real-time disability tracking application such as iHeadache. MIDAS takes into account the past three months of data, which is usually recalled after the fact. Because iHeadache allows you to track your disability in real-time, the results are likely to be more accurate.
The MIDAS Scale
I Minimal or infrequent disability 0-5
II Mild or infrequent disability 6-10
III Moderate disability 11-20
IV Severe disability 21+
MIDAS Test Questions
- On how many days in the last 3 months did you miss work or school because of your headaches?
- How many days in the last 3 months was your productivity at work or school reduced by half or more because of your headaches? (Do not include days you counted in question 1 where you missed work or school.)
- On how many days in the last 3 months did you not do household work because of your headaches?
- How many days in the last three months was your productivity in household work reduced by half of more because of your headaches? (Do not include days you counted in question 3 where you did not do household work.)
- On how many days in the last 3 months did you miss family, social or leisure activities because of your headaches?
- On how many days in the last 3 months did you have a headache? (If a headache lasted more than 1 day, count each day.)
- On a scale of 0 - 10, on average how painful were these headaches? (where 0 = no pain at all and 10 = pain as bad as it can be.)
Tabs and Views in iHeadache
My Diary Tab
The My Diary tab shows you an overview of your headaches. This is also where you add a new headache. This screen is divided into sections:
- Monthly calendar. In the small monthly calendar in the top left corner, headache icons indicate the days when you recorded a headache. If you click one of these icons, a menu appears that lists the headaches you recorded for that day. You can click a headache to display more information about it in the Headache Summary section.
- Information area. Notice the two buttons in this section. You use these buttons to add a new headache. The information area to the right of the calendar shows summary information about headaches for the date you selected on the monthly calendar. It also lists medications that you are taking as part of your treatment plan. Information about treatments shown here comes from the information you recorded on the Preventative tab. If you stopped or started a treatment during the month, you see it under Recent Changes, along with the date you started or stopped the treatment.
- Headache Summary. The bottom section shows the details for the headache that you selected on the calendar. If you want to make changes to your headache, click the Edit button .
Note: If you click a day on the calendar where no headache was entered, the "Headache Summary" area shows helpful hints, links to support and other announcements.
Dashboard tab
The main Dashboard view is where you get information for the headaches you've recorded. You can easily see basic information about your headaches, and you can add information from the other Dashboard views to your main view.
When you first open your main Dashboard view, iHeadache shows you Headache Types and Headache Days:
- Headache Types is a chart that summarizes the headaches you've recorded. The headache types are color-coded so you can see at a glance what kinds of headaches you experienced during the timeframe you chose and how many headaches you had.
- Headache Days is a chart showing the proportion of headache-free days compared to days you had headaches.
iHeadache has other dashboard views with more information related to your headaches, such as disabilities, triggers or treatments. The information shown on all of your Dashboard views comes from the headaches you've recorded. You can attach charts from other Dashboard views to your main dashboard. For example, you could add the acute treatments you've taken most frequently to your main Dashboard view, by going to the Acute Treatments view and clicking the pushpin in the Acute Treatments (Top 5 During Timeframe) section. Sections that you've attached to your dashboard can be removed later.
Dashboard > Acute treatments
The Acute Treatments view on your Dashboard shows information about the type of acute treatments you have recorded. An acute treatment is one that you use to treat a headache once it has started, as opposed to preventative treatments that you use on a regular basis to prevent a headache
Tip: Headache treatments do not have to be medications! You can use iHeadache to record complementary and alternative medicine (CAM) treatments such as ice packs, meditation, acupuncture, yoga, etc.
The Acute Treatments view has three sections, each containing different information based on the headaches you've recorded.
- Acute Treatments (Top 5 during timeframe) shows the five treatments you took most often during the timeframe you chose.
- Acute Headache Treatments shows all the acute treatments you used while you were having headache pain, and the number of times you took each one.
- Treatments without Headache pain shows the acute treatments you took when you did not have a headache.
Note: When you add a new headache, one of the options on the screen is the Information Only checkbox, which lets you track information not directly associated with a specific headache. Acute treatments on headache entries marked "Information Only" appear on this chart. For example, if you had an aura or felt like a bad migraine or headache was about to start, you may decide take an acute medication before the headache begins with the hopes that the headache will not develop further. If you want to track this, you would select the Information Only checkbox on the headache entry and record the treatments you took before the headache developed.
Tip: You can add your own custom acute treatments to iHeadache's default list. Go to the Acute Treatments panel on the My Profile tab and select Custom.
Dashboard > Preventative treatments
The Preventative treatments view on your Dashboard shows preventative treatments that you have taken. A preventative treatment is a medication you take regularly to help prevent headaches. Procedures such as Botox® injections, nerve blocks and some weekly or monthly drug infusions are also considered preventative treatments because they are meant to last a certain period of time and help prevent headaches.
- Headache Types is a chart that summarizes the headaches you've recorded. The headache types are color-coded so you can see at a glance what kinds of headaches you experienced during the timeframe you chose.
- The Preventative Treatments chart shows all of your preventative treatments during the reporting period you selected. You can see the date you started and stopped a treatment, the dose, and the reason you stopped treatments. This information comes from the data you entered on the Preventative tab. (For help on setting up your preventative treatments, click Help on the menu bar at the top of the screen and go to Setting up Your Preventative Treatments.) This chart also shows the dose, which is important if you are gradually increasing or decreasing (titrating) a medication dose.
Tip: You can add your own custom preventative treatments to iHeadache's default list. Go to the Triggers panel on the My Profile tab and select Custom.
Dashboard > Disability
The Disability dashboard view shows information about disability you experienced because of your headaches. Disability means you were unable to participate in your normal activities because of headaches. iHeadache uses a disability survey similar to the Migraine Disability Assessment Scale (MIDAS) to assess the severity of a disability. The MIDAS tries to determine how many days of your life were affected to the point that you were unable to function in a way to which you are accustomed. MIDAS takes into account the past three months when asking the questions and the patient is usually asked to recall the data after the fact. Since iHeadache allows you to track your disability in real-time, the results are likely to be more accurate but the MIDAS was not validated for use in a real-time disability-tracking application.
| 0 to 5 |
MIDAS grade I |
Little or no disability |
| 6 to 10 |
MIDAS Grade II, |
Mild disability |
| 11 to 20 |
MIDAS Grade III |
Moderate disability |
| 21+ |
MIDAS Grade IV, |
Severe disability |
- Hours Disabled shows the hours you were completely and partially disabled. The data in this chart comes from your estimates that you entered when you recorded a headache.
- Real-time Disability Score charts the severity of your disability scores over the timeframe you chose. When you record a headache, you answer the MIDAS disability questions about the activities you were unable to participate in. iHeadache uses this information to calculate a disability score and charts it on the graph. iHeadache needs 90 days of data to accurately chart your disability, so until you have used the system for 90 days it calculates an estimate of your disability score. This is the Estimated score on the chart. After you have been using the system for 90 days, the Estimated score goes away and this view will show your Actual score only.
- Headache Disability Questions shows the number of times you answered Yes to the questions on the Disability section when you recorded a headache.
- Disability Questions on Days Without Headache Pain shows any data you entered indicating a disability when you did not record that you experienced headache pain. For most users, this chart is blank.
Note: When you add a new headache, one of the options on the screen is the Information Only checkbox, which lets you track information not directly associated with a specific headache. Disabilities on headache entries marked "Information Only" appear on this chart. For example, if you had a terrible headache the day before but you are now headache-free but exhausted, you might choose to log your disability but would not enter a headache. To track this, you would check the Information Only checkbox on the headache entry and record your disability. Disability questions on headache entries marked "Information Only" appear on this chart.
Dashboard > Pain
The Pain view on your dashboard shows you details about the pain associated with your headaches:
- Pain Location shows the locations where you experienced pain with your headaches, and the number of occurrences of each. This information comes from the information you entered in the Pain section on the New Headache window.
- Pain Type shows the locations where you experienced pain with your headaches, and the number of occurrences of each, in a graph. The types and locations of pain are already defined in iHeadache.
- Pain Details This section provides details your headache pain. The left side is a list of instances of pain by location. It shows the number of times you had pain in a particular location and the average pain. On the right side is a list of the instances of pain by type. It shows the number of times you had pain of a particular type and the average pain you experienced with each type. iHeadache calculates the average pain from your entries on the Pain section of the New Headache window.
Dashboard > Triggers
The Triggers view on your Dashboard shows you the headache triggers you recorded over the time frame you specified. When you record a headache, you enter the factors that you think may have caused it, and this information appears here.
Note: When you add a new headache, one of the options on the screen is the Information Only checkbox, which lets you track information not directly associated with a specific headache. Triggers on headache entries marked "Information Only" appear on this chart. For example, if chocolate is usually a trigger for you but you ate some and it did not cause a headache, you can record it as "Information Only".To track this, you would select the Information Only checkbox on the headache entry and record the treatments you took before the headache developed.
Dashboard > Symptoms
The Symptoms view on your Dashboard shows the symptoms you recorded for the headaches you experienced. There are four sections on this view that show different information about your headache symptoms, based on the information you entered when you recorded a new headache.
- Headache Symptoms (Top 5 During Timeframe) shows the five most frequent standard headache symptoms you recorded during the timeframe you select. Standard symptoms that are the ones that are already defined in iHeadache. Symptoms other than the five most frequent are grouped together and shown as "Other".
- Custom Headache Symptoms (Top 5 During Timeframe) shows the five most frequent custom headache symptoms you recorded. Custom symptoms are symptoms that you added to iHeadache when you set up your profile. Symptoms other than the five most frequent are grouped together and shown as "Other".
- Headache symptoms shows the number of times you experienced particular symptoms during the timeframe.
- Symptoms Recorded without Headache Pain shows any symptoms you entered that were not accompanied by headache pain. For example, you could record when you experienced nausea, even if you did not have a headache, or you could record having an aura without getting a migraine. This lets you determine if a particular symptom is always associated with a headache. For most users, this chart is blank.
Tip: Depending on the number of symptoms you have, the lines on the Headache symptoms and Symptoms Recorded without Headache Pain charts may become very thin. If you have many symptoms, the lines may become too thin for the labels to be shown. If this happens, you can mouse over the bar on the bar chart to see the symptom and number of occurrences.
Dashboard > Monthly Calendars
The Monthly Calendars view on your Dashboard is another way to look at your headache data. This view gives you a broad overview of your headaches for a particular timeframe. For example, you can see at a glance all the headaches you've entered for the past year. Headaches are shown on the day they occurred, color-coded by type. By default, iHeadache shows the most recent twelve months of data, but you can change this to display headaches for a different timeframe. If you want to make changes to a headache, or just want to see more details about a headache, use the Calendar tab.
Note: If more than one headache occurred on the same day, this calendar only shows the last headache of the day.
Calendar tab
The Calendar is a visual overview of your headache history, type of headaches, time they began and ended, and medications you took. You can search for headaches, go to information for a specific dates, and make changes to an existing headache. The default view is the monthly view, which shows an overview of your headaches for a calendar month, and other views are available.
- Day shows headache information for a particular day, broken down by hour, giving you a detailed view of what happened with your headache that day.
- Weekly shows headache information for a particular week. Each day's data is broken down by hour, giving a detailed view of what happened with the headache.
- Month shows headache information for a calendar month, broken down by day.
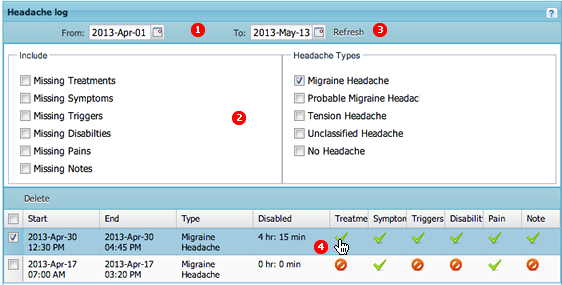
Headache log tab
Use the Headache Log tab to find headaches you want to edit. Typically, you do this to finish an incomplete headache entry. Use the sections on this window to help narrow your search, to easily find the specific headache you're looking for.
Use the From date and To Date fields to specify a range of dates for your search.
You can type the dates in the fields or click the calendar icon  and select a day from the calendar that appears.
- Decide what headaches you want to include in the list by checking the various checkboxes. Check one or more boxes in the Include section to find the headaches that are missing particular information, such as triggers or symptoms. For example, if you're looking only for headache entries that are missing triggers, you would check the Triggers box. Similarly, in the Headache Types column check the specific headache types you want to show. For example, if you wanted to retrieve only migraines, you would check only the box labeled Migraine Headache. If you don't check any boxes in one of the columns, iHeadache treats it as though you checked all the boxes. In other words, it displays all the headaches types of missing data types within the date range you selected.
- When you click Refresh, the system displays the 12 most recent headaches that meet your criteria.
 in a column indicates the information is complete.
  indicates information is missing.
- Click the Recent and Older buttons to move through additional headaches.
Preventatives tab
The Preventatives tab is where you enter details about the preventative treatments you take. On this tab you record when you started and stopped taking your treatments, the dose, and why you stopped taking them. The information you define here shows up in your headache diary and reports.
Tip: Before you use this tab, you need to go to your profile and define your preventative treatments. (For instructions on how to do this, click Help on the main bar and go to Setting up Your Preventative Treatments.)
There are two sections on this window. The top section is a calendar that shows which preventatives are being taken and the headaches for the month you selected. Two tabs on the bottom section let you add active treatments and see your inactive treatments.
- Display treatments for a particular month By default the Preventatives tab shows your preventative treatments for the current calendar month. To go to another month, click the icon. Use the arrow keys to go forward and backward until you find the month you want. Click Go. iHeadache shows the headaches you recorded for the month and the treatments you were taking.
- Add a treatment On the Active Treatments tab, click and enter the details in the fields that appear:
- In the Name field, click the control to display the list of your preventative treatments. Select a treatment from the list.
- In the Dose field, enter the dose you take, in milligrams.
- Use the Start date field to enter the date you started this treatment.
You can type the dates in the fields or click the calendar icon and select a day from the calendar that appears.
- Click the Update button.
- Record that you stopped taking a treatment On the Active treatments tab, find the treatment you want to update. In the Stop Date field, enter the date you stopped taking the treatment.
You can type the dates in the fields or click the calendar icon and select a day from the calendar that appears. In the Reason field, use the controls to find the reason. When you click Update, the treatment moves to your Inactive tab.
Reports tab
Use this window to generate reports. If you have given your physician permission to access your data in iHeadache he or she can generate reports, which they can copy and past into their Electronic Medical Records (EMR).
Tip: To give your physician or health care provider access to your iHeadache data, you must add them to your profile. On the My Profile tab, click Physicians, then click Add and search for your physician's name. The physician must be registered in the iHeadache system. Click here for more information.
- Use the From: and To: fields to select the dates to include in the report.
You can type the dates in the fields or click the calendar icon and select a day from the calendar that appears.
- Click Group by to organize the data on your report by quarterly, monthly, 30 days, 28 days, or weekly. If you are using a number of days, the report starts from the end date and works it way back to an earlier time.
- In the Include section, check the boxes to specify the data you want to include in your report. You can display headache type, acute treatments, preventative treatments, disability, triggers, MIDAS scale and notes, or any combination of these.
- When you have made your selection, click the Create button. Your report appears in the Report Viewer section. To print the report, click .
My Profile tab
Use the My Profile tab to define how you want your report preferences and set up you personal profile information.
Preferences
Use the Preference view on your profile to set application preferences that are used for headache classification and reports. iHeadache determines the types of headaches you enter using rules inspired by the International Headache Society. Migraine, probable migraine, and tension headaches are currently supported in iHeadache. Click here to learn more about headache classifications and types.
Headache Order Test Preference Use this section how you want iHeadache to list your headaches in reports. It is possible for a single headache to meet criteria for both . For those headaches that meet the criteria for tension type headache and probable migraine headache, the system will report the one that you specify here.
Headache Duration Rules Use this section to specify how iHeadache handles headache duration times. A headache must last at least 4 hours to be diagnosed as a migraine, although iHeadache will classify a headache lasting less than 4 hours a migraine if an acute headache-specific medication is being taken. The diagnosis of tension headache requires an individual headache to last at least 30 minutes
- Use duration if entered. We recommend using this setting. The system will use the time criteria when it has been entered, and ignore time criteria when it is not entered and not needed, to classify the headache type. If the system can determine the headache type based upon the data entered, it will display the headache type as tension, migraine, or probable migraine. If there is not enough info about the headache to determine the type, iHeadache will classify it as an unclassified headache.
- Ignore Duration. The headache duration will be ignored and not used in any of the headache classification analysis. How can this be if it has to be 4+ hours to determine migraine?
- Require Duration. iHeadache will require a start time and stop time to be able to classify headaches. If you choose this option, all headaches without a stop time will be classified as Unclassified Headache.
Display Medication Names in Reports Use this section to specify how to display medication names on reports.
You can use trade names, generic names, or both generic and trade names in reports. Examples of trade names, also called brand names are Imitrex®, Topamax®, Advil®.
Examples of generic names are Sumatriptan, Topiramate and Ibuprofen.
My Profile > Acute Treatments
There are approximately 45 acute headache treatments already set up in iHeadache, but you probably just use a few treatments that you take during your headaches. Acute treatments are used to alleviate your current symptoms and they are only taken when necessary. They are typically not taken on a daily basis like preventative (prophylaxis) medications.
When you are having a headache the last thing you want to do is sort through a long list, so you can add your treatments to your acute treatment profile. When you add a new headache, only the acute medications or treatments that you actually use appear in the list. If you take another treatment that is not on the list, you can add it to your profile. Treatments can be medication or Complementary and Alternative Medicine (CAM) treatments, such as yoga, ice packs or massages.
Note: The presence of a medication on this list does not represent any type of endorsement.
There are two tabs on this window:
- The Common tab shows treatments that are either FDA- approved for acute migraine headache treatment, or are medications that many physicians use (off label) to treat migraines and other headaches. You can click the column heading to sort the list by the trade name (brand name), generic name, the form, dose, or whether it is a migraine-specific medication.
- The Custom tab lets you add a treatment not listed on the Common tab.
- Add standard acute treatments to your profile. On the Common tab, click the check mark next to treatments that you want to be included when you add a headache, then click the OK button to save your changes. If you've added a medication and decide you don't want to see it anymore, you can uncheck it to remove it from your profile. If later you decide that you want to use the medicine again, you can recheck it. Unshackling a medication does not remove it from the current headaches and does not affect reports.
- Add a custom medication or treatment to your profile. If later you decide you don't want to see a treatment you can uncheck it. Click the Add button and fill in the fields that appear.
 Learn more
- You can enter a Trade Name, Generic Name, or both.
- Form is a way for you to identify the type of treatment. Common forms include injection, capsule, and suppository, and you can identify CAM treatments.
- Dose is the milligrams, micrograms or other terms you use to describe how much of the medication you're taking.
- The Migraine Specific column is for medications that are prescribed specifically to treat migraines. This setting is used when determining the headache classification. In general, only medications used specifically to treat migraines are considered migraine-specific. Sumatriptan or dihydroergotamine are examples of migraine-specific therapy, ibuprofen or tylenol are not. Excedrin migraine is also considered a non-migraine specific medication because its ingredients are used to treat other types of pain.
Make sure that there is a check mark in the Included column next to the treatment you added. Click the Update button, then
the OK button to save your entry.
Close
- Delete a treatment. Click next to the treatment you want to delete and click the Delete button. We recommend you deactivate the treatment, rather than the deleting it.
- Deactivate a treatment. Uncheck the treatment. The medication is still available in your profile but will not appear in your lists. Is this true for both common & custom? Treatments are still shown on your previous headaches, but will not be available for future headaches.
- Customize the way data appears in the tabs. You can sort data on any column, hide, rearrange columns, or change their widths. Learn more
- When you move your cursor to the far right of any column header, a control appears. Click it to display a small menu that lets you sort the data in the table by the current column. You can choose ascending or descending.
- You can also hide columns in the table. When you move your cursor over Columns on the menu, another menu appears, showing the name of the columns in the table. You can uncheck a column to remove it from the view. You can restore the column later by opening this menu and checking it again.
- To change the width of a column, move your mouse cursor to the border between any two columns in the gray bar at the top of the table. The cursor changes to a vertical bar with a left/right-pointing arrow. Click and drag the bar to increase or decrease the column width.
- To move a column, click and drag the column header and drop it in the new location. Two small blue arrows appear in front of a column to indicate you can place the column there.
Close
My Profile > Preventative Treatments
The Preventative Treatments view on your Profile is where you define which preventative treatments you want to track. A preventative treatment is one that you take to help prevent headaches (called prophylaxis), as opposed to treatments you take in response to an actual headache. iHeadache provides a list of common treatments that have been shown to prevent headaches. You are probably only taking a few of these, so you can add just the ones you take to your profile. In addition to the standard treatments included in iHeadache, you can also add your own custom preventative treatments.
Note: Once you add treatments here, so that they will show up on your Preventative tab, where you define details such as medication, dosage and the dates you started or stopped taking the medication.
There are two tabs on this window:
- The Common tab shows a list of treatments that have been shown to prevent headaches.
- The Custom tab lets you add preventative treatments that are not on the standard list.
- Add standard preventive treatments to your profile. Go to the Common tab. Select the checkbox next to the treatments you want to add and click the OK button.
- Add custom preventive treatments to your profile. Go to the Custom tab and click the Add button. You can enter a trade name, generic name or both. We recommend adding both the trade name and the generic name. If you are only going to use one name, we recommend that you duplicate the name in both columns. Be sure the checkbox for this treatment is checked so it will appear in your profile.
- Delete a treatment. On the Common or Custom tab, click next to the treatment you want to delete and click the Delete button. We recommend you deactivate the treatment, rather than the deleting it.
- Disable a treatment. On the Common or Custom tab, uncheck the treatment. The medication is still available in your profile but will not appear in your lists. Deleted and inactivate treatments are still shown on your previous headaches, but will not be available for future headaches.
- Customize the way data appears in the tabs.
My Profile > Triggers
Use the Triggers view on your Profile to define the possible headache triggers you want to track. iHeadache includes a list of more than 40 triggers. Defining triggers in your profile lets you track only your applicable triggers instead of having to search through the entire list every time you enter information for a headache.
There are two tabs on this window:
- The Common tab is a list of headache triggers that are most commonly identified by physicians and research.
- The Custom tab lets you add triggers that are not in the common list.
 What you can do on this window:
- Add standard triggers to your profile. Go to the Common tab and check the box next to the triggers you want to track.
- Add custom triggers to your profile. Go to the Custom tab and click Add. Type the trigger in the field that appear, then click Update.
- Delete a custom trigger. Only custom triggers can be deleted. We recommend that you stop tracking a trigger rather than deleting it. If you're sure you will never want to track a particular trigger, check the box next to the trigger and click the Delete button.
- Disable a trigger. Go to the Common or Custom tab and uncheck the box in the Track column next to the trigger you want to stop tracking. You can always reactivate it later if you ever want to track it again.
- Customize the way data appears in the tabs. You can sort data on any column, hide, rearrange columns, or change their widths. <.li>
My Profile > Symptoms
iHeadache asks questions about your headache symptoms to help determine the type of headache (migraine, tension, etc.) you are having. A list of standard symptoms is already defined in the system, but you may experience other symptoms with your headache. You can add custom symptoms to your profile so that they will appear on the list you use when you answer questions about symptoms as you add information for a new headache. Keep in mind you still need to answer questions about standard symptoms in order for iHeadache to determine the headache type.
- Add a Custom Symptom. Click the Add button and type a name for the symptom. Click the Update button, then click the OK button to save your changes.
- Disable a symptom. If you want to stop tracking a custom symptom, we recommend you just uncheck it on your profile rather than deleting it. In the Include column, clear the box next to the symptom to disable it.
- Delete a custom symptom. Deleting a symptom is not recommended, but if you're sure you will not use a custom symptom again, you can remove it from your profile. Check the checkbox beside the symptom and click the Delete button.
Caution:Deleting a custom symptom may make the reports inaccurate from the time period that you used to track this custom symptom. Instead, we recommend you disable a symptom you don't want to use. It remains in your profile but does not appear on your list of available symptoms when you add a headache.
- Customize the way data appears in the tabs.
- You can sort data on any column, hide, rearrange columns, or change their widths.
My Profile > Physicians
The physicians that you have added to your profile can access your records in iHeadache. To be added to your profile, the physician must first be registered in iHeadache, and once they are you can share your data with them. The physicians that you add to your profile can cut and paste data or import entire reports to their Electronic Medical Records (EMR). iHeadache sends the providers you add an email, notifying them that you asked to give them access to your data. They can confirm or decline you as their patient. Once the doctor has confirmed you as a patient, you can begin sharing data.
If your physician is not already registered in iHeadache, click here (need this link) and fill out the online form. You can also download a brochure here, which you can take to your doctor. (need this link
- When you move your cursor to the far right of any column header, a control appears. Click it to display a small menu that lets you sort the data in the table by the current column. You can choose ascending or descending.
- You can also hide columns in the table. When you move your cursor over Columns on the menu, another menu appears, showing the name of the columns in the table. You can uncheck a column to remove it from the view. You can restore the column later by opening this menu and checking it again.
- To change the width of a column, move your mouse cursor to the border between any two columns in the gray bar at the top of the table. The cursor changes to a vertical bar with a left/right-pointing arrow. Click and drag the bar to increase or decrease the column width.
- To move a column, click and drag the column header and drop it in the new location. Two small blue arrows appear in front of a column to indicate you can place the column there.
Close
Tip: You can add multiple providers. For example, if your physician and their nurse provider is on the list, you can add them both.